Below you can find the link for my finished promotional video for the Martin Mere Centre:
https://drive.google.com/open?id=1HhoGjGIDLDqV3jNilxEXypxifJ2cpxZv
Below you can find the link for my finished promotional video for the Martin Mere Centre:
https://drive.google.com/open?id=1HhoGjGIDLDqV3jNilxEXypxifJ2cpxZv
After gathering all of my vox pops I got in touch with all of my interviewees I used in my completed vox pops, and sent them all a release form via email, which they all printed out, and filled in, and sent to me via post. Below you can see all the release forms for all the people involved with my vox pops.
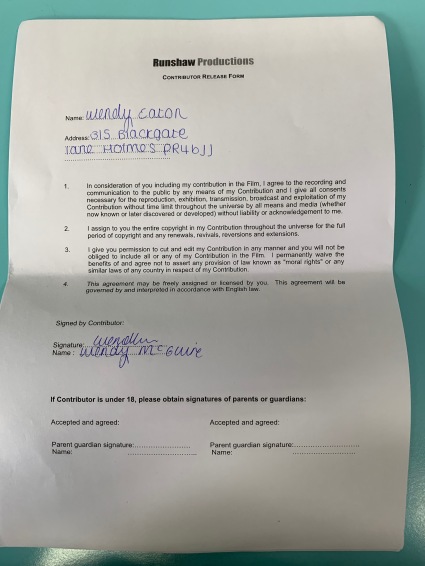
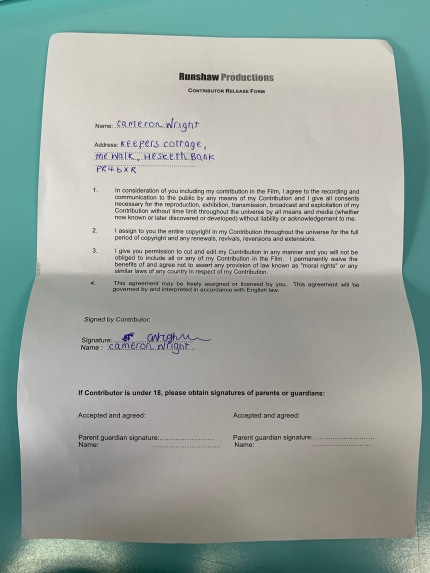
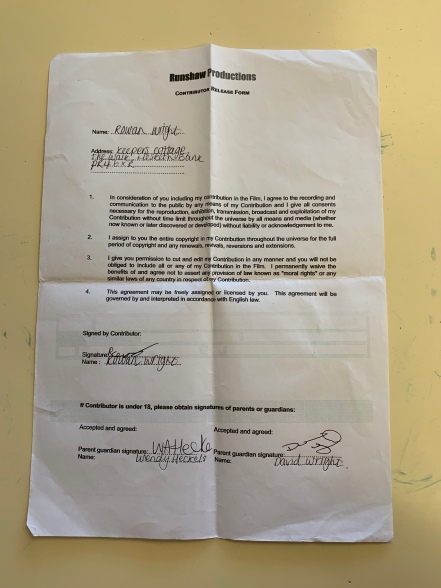
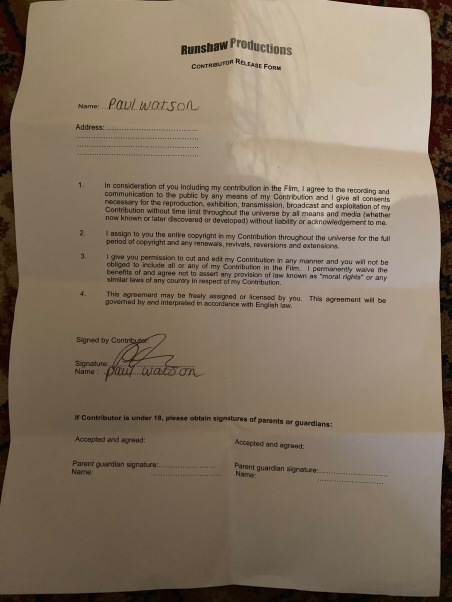
These release forms are a vital pieces of information, as they give me full, in writing consent to use the vox pops interviews in my promotional video, and help me to avoid any legal issues to do with using footage of people without consent.
As you can tell from the title of the blog, today was my 6th editing session, after re shooting two vox pops this weekend the aim of the editing session was to, add music, add in my newly filmed vox pops, add lower thirds, and touch up any other little things that needed fixing in order to finish my edit.
After getting logged on to my editing mac, I decided first to work on my newly filmed vox pops. After importing the clip into my library I dragged them into the timeline with the others, and ensured they were edited. After adding them in I watched the vox pop sections back to ensure they all went together, and there was no other issues with them, and after that I moved onto working on the music for my video.
As you can see from my previous blog, I decided on my music before starting editing. The music I got was from a copyright free music website called Bensound, and the track I chose was called Autumn Breeze. After downloading it I added the track all the way along my timeline underneath all my clips. After ensuring the track was being played through then whole video I then went ahead with the blade tool and chopped up the track in different places, so I could lower the volume of it when the interviews and vox pops were playing, and then make the music come on loud again in the montage sections. Once I had to volume levels right for the music, and I had faded it in and out for interviews and vox pops I then went into to my credits, and added Bensound. This was to give the website credit for the music, and to keep to their guidelines, as their rule is anyone can use their music, as long as they credit the website for it, something I did.
After working on my music I wanted to try and deal with one of the issues I noted the other day, regarding some of Chris’ interviews sections in the video. In some of Chris’ interview sections he is on screen for a long amount of time, due to me having no relate able cutaways to go over what he is speaking about in regards to the history of the WWT. After looking into archive footage I realised that waste an option, and decided to just have a play around with clips to see what I can do. For the first one I decided to move the cutaways along a bit, and so the little montage that plays over the interview starts a little area, removing some of the time Chris is just talk at a camera. The section section like this however was 40 seconds, and I couldn’t move my cutaways up any, do to them needing to be over a certain section to go with what he is talking about. In light of this I decided to have a look through my library, to see if I could make use of any of the clips I hadn’t put to use yet. After looking through I managed to find a couple of shots of the centre, and the wildlife that I hadn’t used. I decided that even though they didn’t reflect what Chris was saying at the point in the interview they would make the section more interesting than just watching Chris talk.
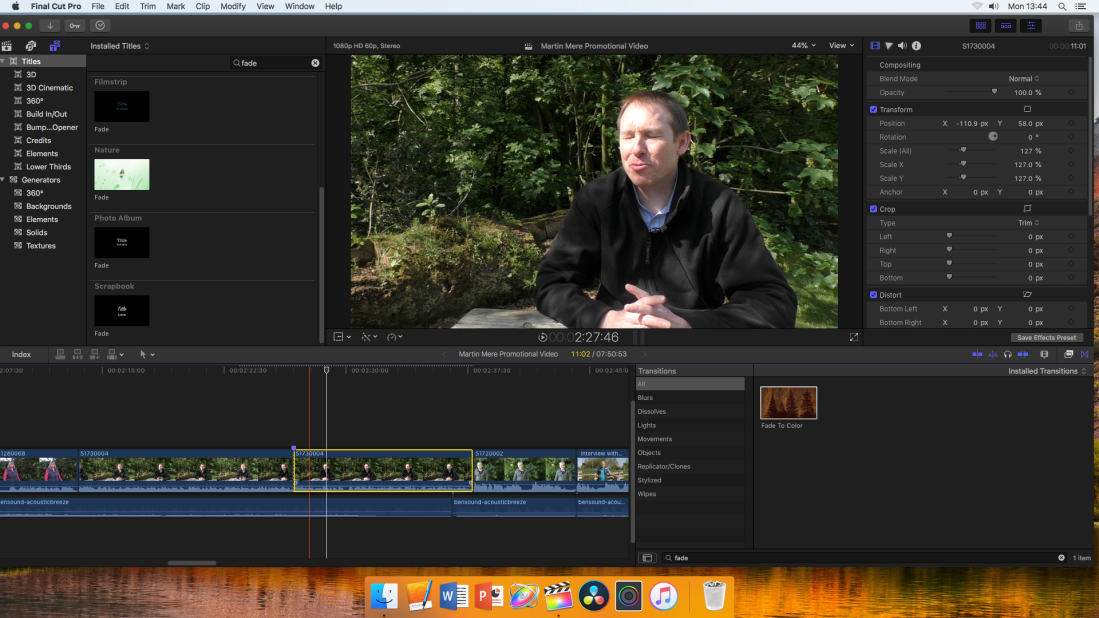
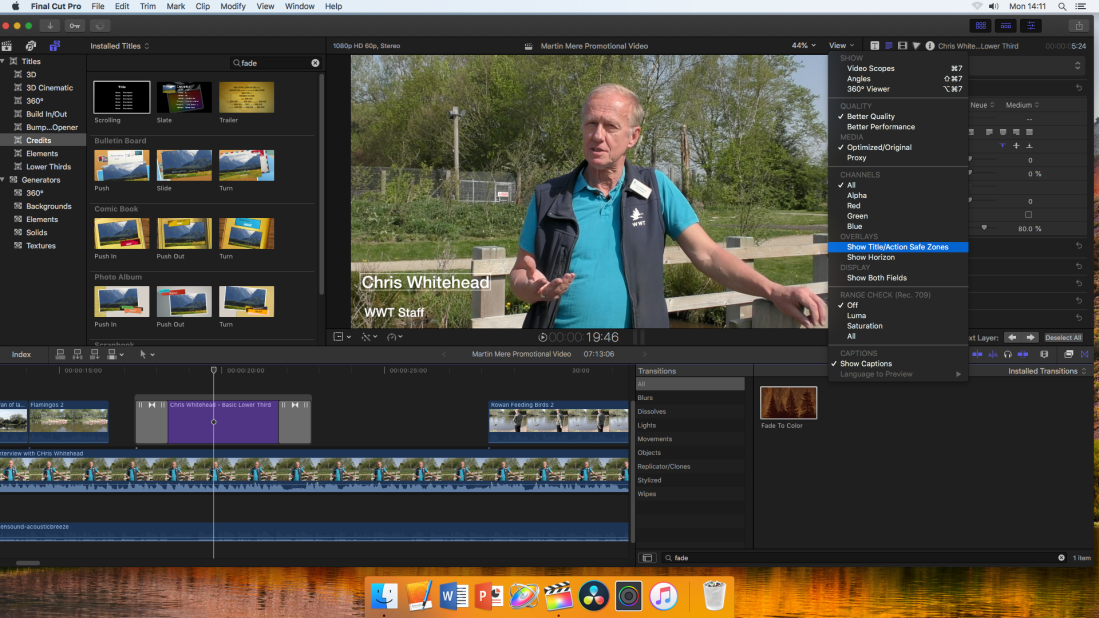
After that I was pretty much done with my edit, I just had to fix a couple little bits, just to add some finishing touches to my work, the first one being a lower third to Chris’ interview. I was going to also add lower thirds to the vox pops, but after conversing with my mentor I decided against it, as he said that the vox pops don’t need them, as they are just random passers by, representing the voice of the people. I was also going to add the WWT logo to the lower thirds, but I thought it would over crowd the screen, and I didn’t think there was enough room for it, so I decided against it. With this decision made I added in a lower third just over Chris’ first interview section using a transition to make it fade in and out. From there the last finishing touch I had to do was add a fade from black at the start of my video, and a fade to black at the end. I wanted to do this, as I think it makes the ending and the start smoother and more professional, and also is nicer to watch, and isn’t as harsh it is just starting and ending. To add them I just added the transitions from the transitions panel.
After doing all that I was finished with my edit! I am really proud of how it turned out, and I can’t wait to send it off to Victoria and get her opinion on it, along with the Martin Mere Facebook page members.
As I am coming up to finishing my final edit for my promotional video, I needed to decide on a soundtrack to go with it. I knew I wanted something up beat, and most importantly copyright free. After searching around a couple of sites I finally came across one call Bensound.com, which has copyright free music on it that you can either buy, or download for free, depending on which sounds you want, and how much they cost. The only thing you have to do if you use the sounds from the website is credit Bensound in the credits, or description to the video. I wasn’t too bothered about paying for some music for my video, as I think it is a important element of the piece, however I decided to browse through the free ones first, and if I didn’t find one I liked I told myself I would look through the purchasable ones, and buy one I like.
Whilst searching through the free section of the website I came across a sound I really liked. After playing it against my edit, I decided it would go perfectly. The sound was called Autumn Breeze, and I have put a link to it below for you to hear. In my promotional video I aim to have the same song playing throughout the whole video, the main reason why I decided not to create a soundtrack planning document, as there would be not point, as I am playing the same audio all the way through.
https://www.bensound.com/royalty-free-music/track/acoustic-breeze
After choosing my music I aim to now put it into my edit, and credit BenSound in the credits to avoid any copyright issues.
Today as you will know from my previous blogs is the day I was going to re film two of my vox pops at the Martin Mere centre, and my 6th day of filming. The aim of the shoot as I have already mentioned was to re film two of my failed vox pops with Rowan Wright, and someone new called Paul who I know.
The night before going to film I did my usual checks, like checking the camera battery, and putting all my equipment in the car, along with my filming signs to warn people I am filming at the centre, and some planning documents, like my location RECCEs, location risk assessments, call sheet for the day, and equipment and resources document.
This morning I arrived at the centre at my usual time of 11:00am, and went straight to one of my locations, ready to film my first vox pop. After setting up I met up with Rowan to film his vox pop style interview for my promotional video. After getting a much better interview with Rowan I went on to interview Paul. His interview was probably the best I had gotten so far, and I was really happy with it, as it was different to the others, not just in framing (we filmed it on a picnic bench) but also in his opinions, adding variety, and diversity in to my vox pops.
After getting my two vox pops I decided to head home, as I didn’t need any other footage, and I thought it would be good to go home, and catch up on some work. I am really happy with how they both turned out, the weather was lovely on the day, and lit my shots well, going hand in hand with the nice mise-en-scene I had in the shots that I had planned carefully. Obviously they will both need editing a bit, mostly to remove my voice at the start and end of the clips, but apart from that I think they are really well shot, and won’t need too much doing to them.
In reflection, I am really happy with how the shoot went, I got everything I wanted to filmed, and the weather was nice, lighting my shots well, and also adding colour to my shots. After getting all the footage I needed from the centre I am now excited to get them into Final Cut Pro, and hopefully finish editing.
Today I worked in the edit suite for my fifth editing session on my promotional video. The aim of the editing session was to continue working on the improvements that my audience had given to me, and also the improvement I wanted to make myself.
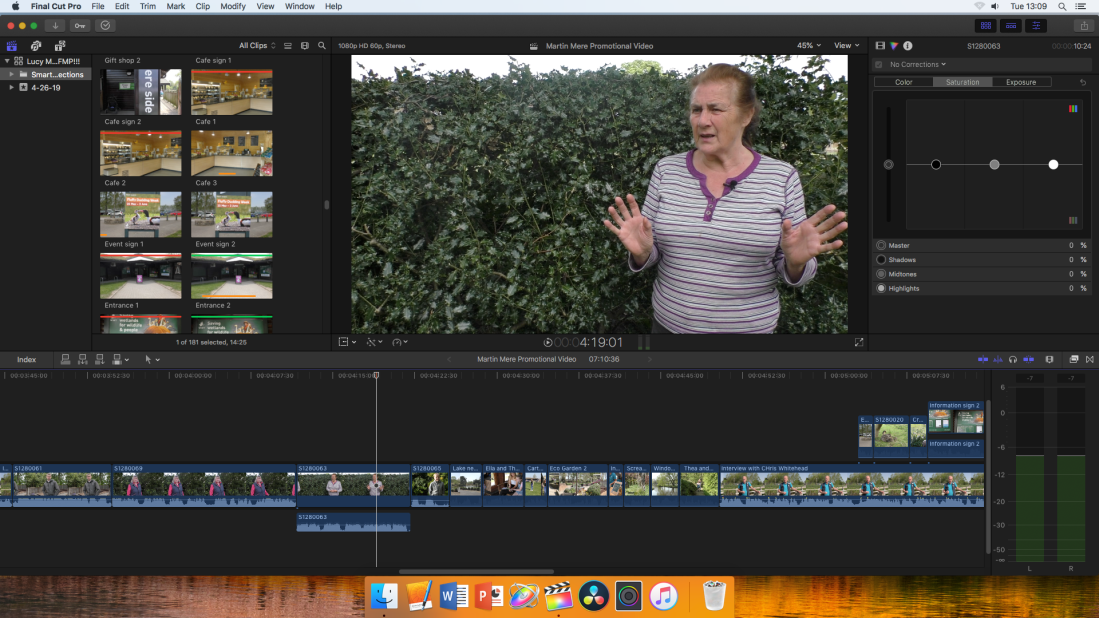
After getting logged onto my mac in the editing suite, I decided to first work on some transformation of framing for my main interview with Chris Whitehead. To do this I followed the research I did into it a few blogs back. Firstly, I selected the first interview section with Chris, and positioned the play head of the clip, so it was shown in the viewer, from there I went into the inspector, and into the transform section, where I used the scale slider to focus in mt framing more to Chris, and remove pointless space from around him. I did mess around a little but with the up and down, left and right controls to get the framing perfect, but apart from that I didn’t really do much. Because Chris is in the same position for all the interview section of video I decided to copy and paste the attributes of the first interview sections onto the others, instead of repeating the process on each one. To copy and paste attributes I selected the clip, and pressed command C, to paste the attributes I pressed command shift V.
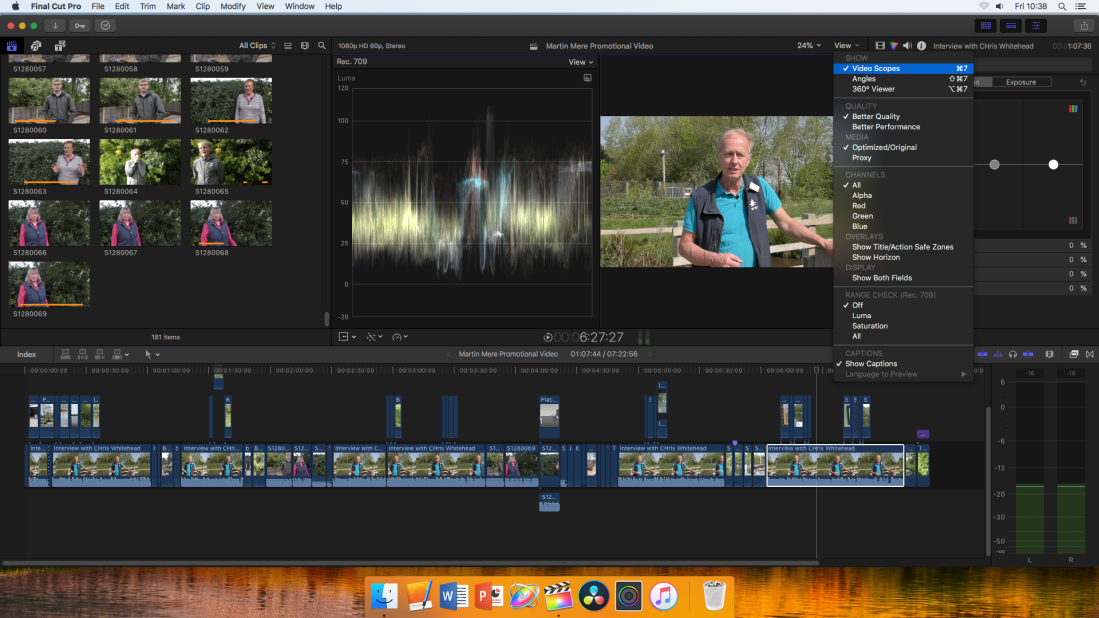
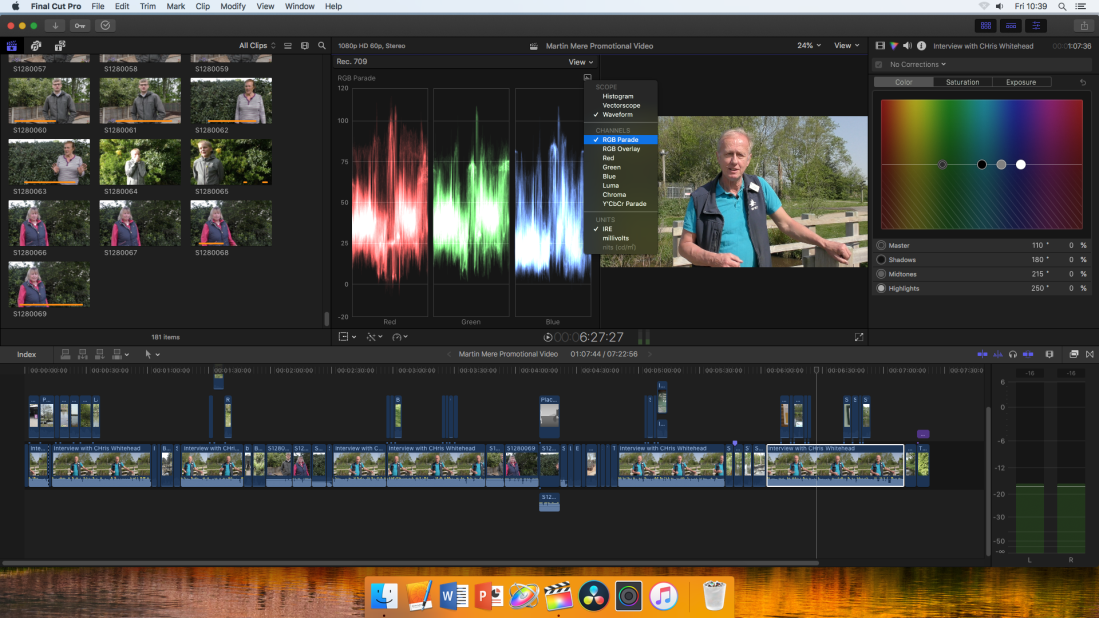
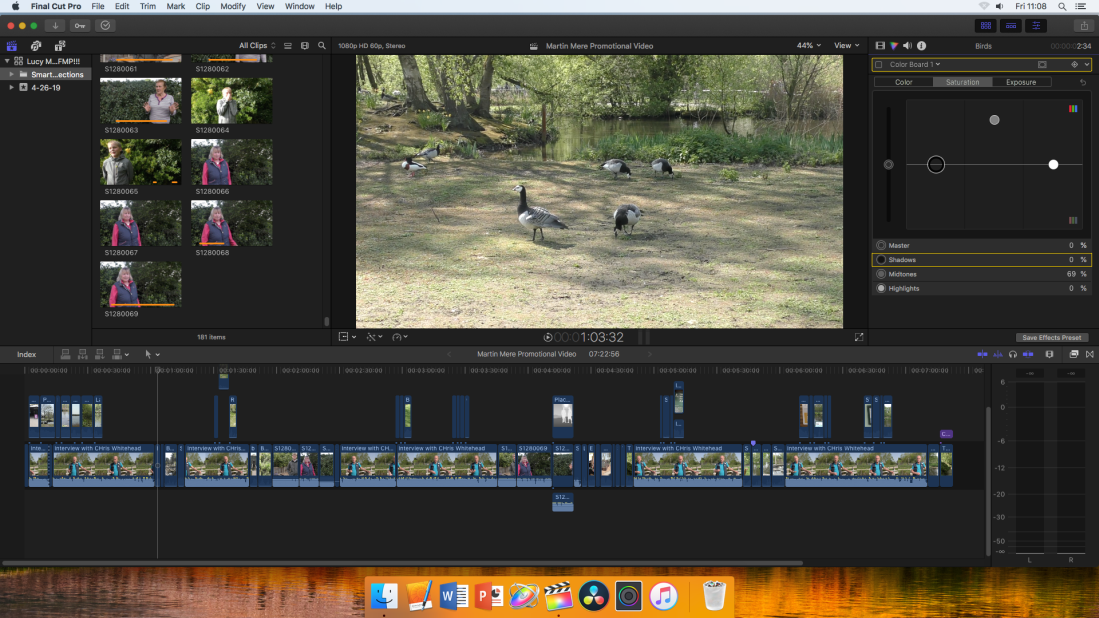
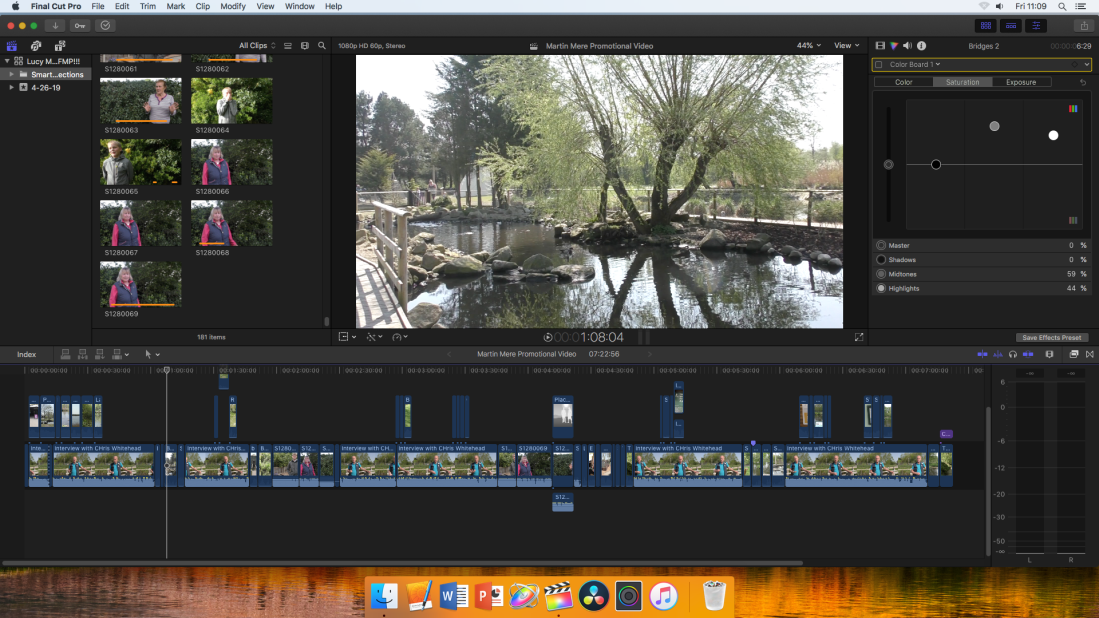
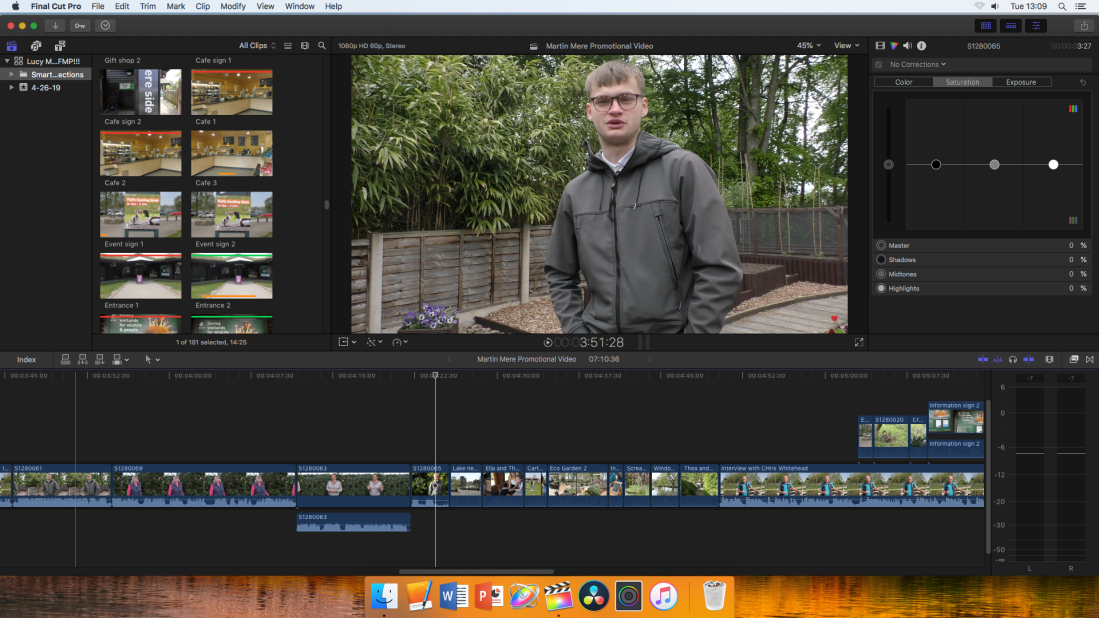
After doing some transformation I decided to do some colour correction on some of my clips. I followed the research I did the other day to get me into the colour board thing, and then used by video scopes and RGB parade to help me touch up each clip one by one. To get onto the colour board thing I selected the clip I wanted to edit, and got the clip displayed in the viewer by putting the play head over it, once there I then went into the inspector, and to the colour section, from there I could work on the colour, exposure and saturation of each clip, using the video scopes and RGB parade to help me.Below you can see some of before and afters of clips I edited.

After colour grading something I realised was that in Chris’ interview sections he is seen on screen a lot, sometimes for more than thirty seconds, which can be boring and disengaging for the audience, something I might look into for that is maybe getting some archive footage, as the parts where he is on screen the longest he is talking about Peter Scott who set up the centre.
Overall, I am really happy with how my 5 editing session went I got even more done in my project, including fixing the framing of my interview, and colour correcting, I aim to keep editing next week, and film my vox pops this weekend, and hopefully finish editing on Tuesday.
After making the decision to go out and re shoot two of my vox pops the other day, I needed to book out some equipment ready for the re filming this weekend upcoming. To do this as you probably know by now I just email the media booking team at college, asking them if they have the equipment I want free for the time I want it, if they do I book it in to take. Below you can see the email I sent, booking out the same equipment as I have done for every filming day for this project, to ensure none of the quality changes. Below you can see the email conversation we had.
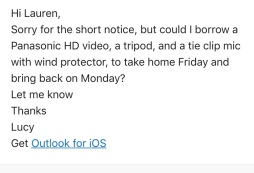
Now with my equipment all booked for Friday I can focus on planning for the shoot, without worrying about not getting equipment.
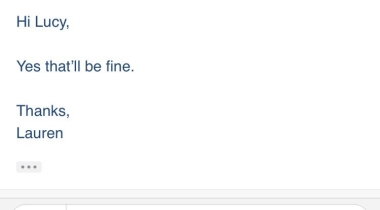
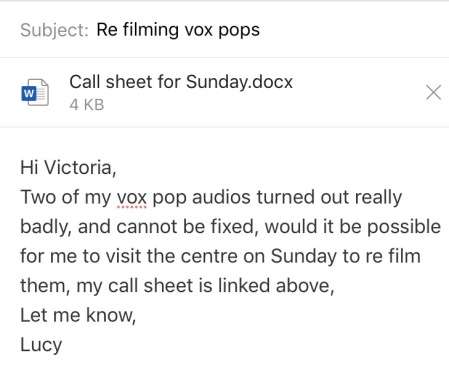
After deciding yesterday that I need to re film two of my vox pops today I decided to get in contact with Martin Mere, and ask Victoria if it was okay for me to come. In the email I also sent the call sheet that I have linked below, so that she could see the details of the shoot, and what I am filming. I emailed Victoria her call sheet, and hand delivered the other two to Rowan and Paul, as I see them both often, due them being friends of them family.
To this email Victoria responded that it would be fine for me to come, and she would let the admissions team know I was coming. Now with equipment conformation and confirmation from Martin Mere I can now just continue working, and not have to worry about filming at the weekend, as everything is prepared for it.
Today was my fourth editing session in the edit suite, and the aim of the editing time was to add in my newly filmed vox pops and to start working on some of the improvement my audience suggested I do in my rough edit questionnaire. Before going into the edit suite I printed out the results from my questionnaire, so I could see the feedback in front of me when editing, to remind myself of ideas that would be good to include.
Once in the edit suite I got logged onto my mac, and continued editing my work. I started by importing the new vox pops I had filmed at the weekend. After importing the footage I went ahead and started placing them into my timeline, depending on where I would see them best fit. I decided to include the first question about why they have visited the centre on that particular day before one of Chris whiteheads interview sections, as I thought it would fit best right before he finished talking about the activities at the centre. The other question I decide to put right after the interview section where Chris talk about the activities at the centre, as they describing their favourite parts of the centre would tie in well with him talk about the different things there to see and do. After deciding where I wanted the vox pops to go I have to put them together ensuring each vox pop faced a different way to the one before, following one of he convention of vox pops, as well as editing the clips, so only the best part of the answers were used.
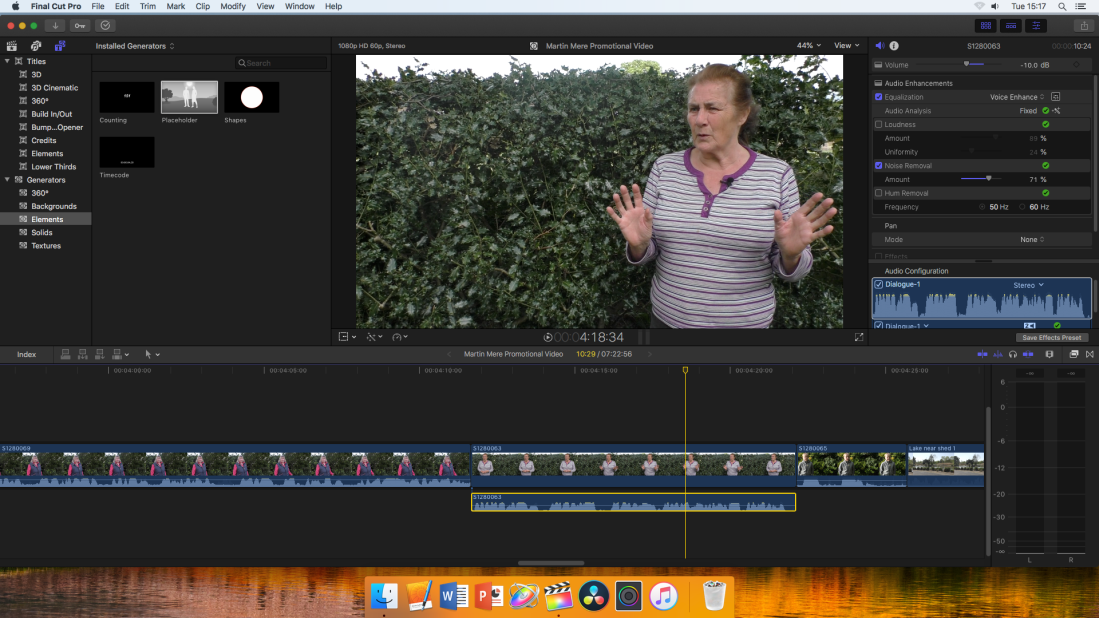
After sorting through my vox pops and trying to edit them I did come across a couple of issues with in them. The first issue was to do with the audio on the interview with Carole, the older lady in the vox pops, shown in the top screen shot above. I found in her interview he audio was really distorted for some weird reason that I couldn’t figure out, considering there was no wind on the filming day. At first I did try and fix the clip, as you can see from the screen shots below, after playing around with the audio settings, it only seemed to get worse, and the only thing I could think of doing was to go back to the Martin Mere centre, and re film another vox pop. Another vox pop I had an issue with was the one of the young boy, Rowan, shown in the middle screen shot above, in his interview, because of the giggles he had when filming a lot of his interview had to be cropped out because he was laughing while talking, meaning the bits I was left with wasn’t really enough, and din’t really make any sense. There was no way I could have fixed this, as there just wasn’t enough there to work with meaning I would have to go back to the centre, and re film 2 vox pops, to make up for the two dodge ones I got.
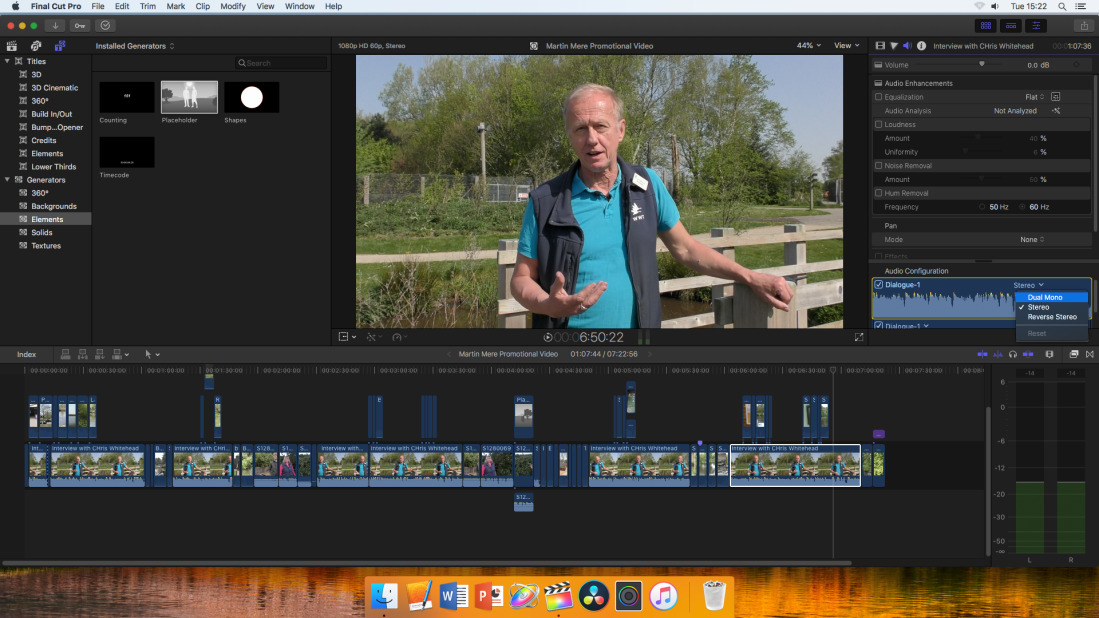
After working on my vox pops I moved on to working on some of my improvements, starting with fixing the audio in my main interview. After researching how to do it yesterday, it was really easy to fix, and I just follow the steps I found in the article yesterday to change the audio to duel mono from stereo, and it was fixed, all I had to do from there was repeat it on the other main interview sections.
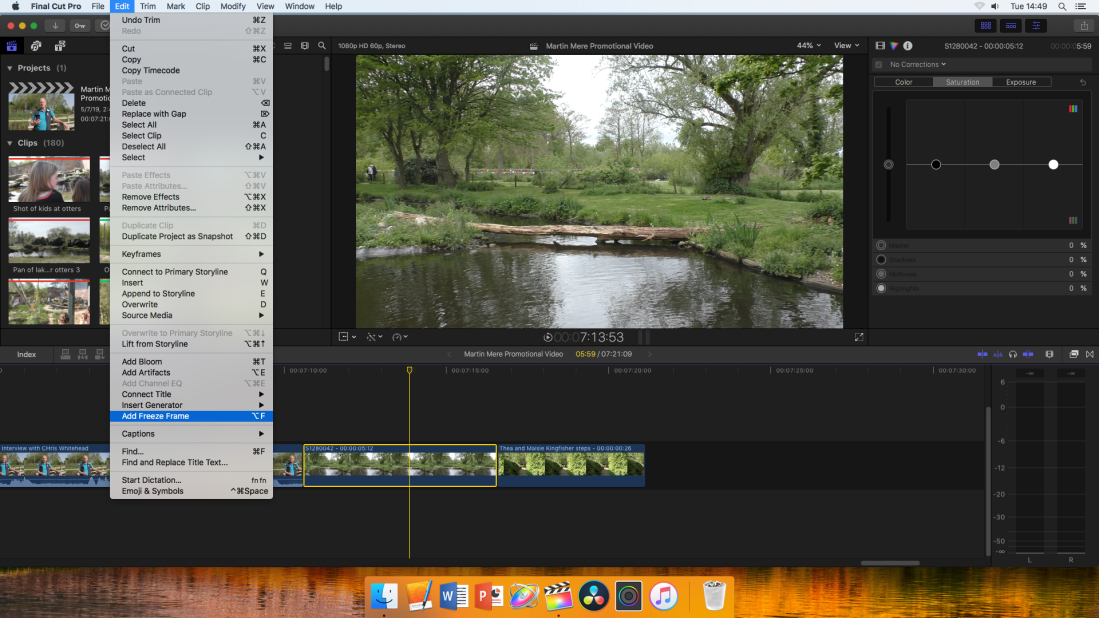
After working on fixing the dodgy audio I decided to work on the credits in my video, and neaten up the ending. To do this I went in the credits section in the panel near my imported clips, and just dragged in two rolling credits over two freeze frames of shots I put in at the end. To get the freeze frames I selected the clip I wanted a freeze frame from in the browser, and then went into edit, and add freeze frame, which added one to my timeline, see below.
After that as I have mentioned I simply added the rolling credits onto both freeze frames, and in one added information about the centre, and one added the credits.
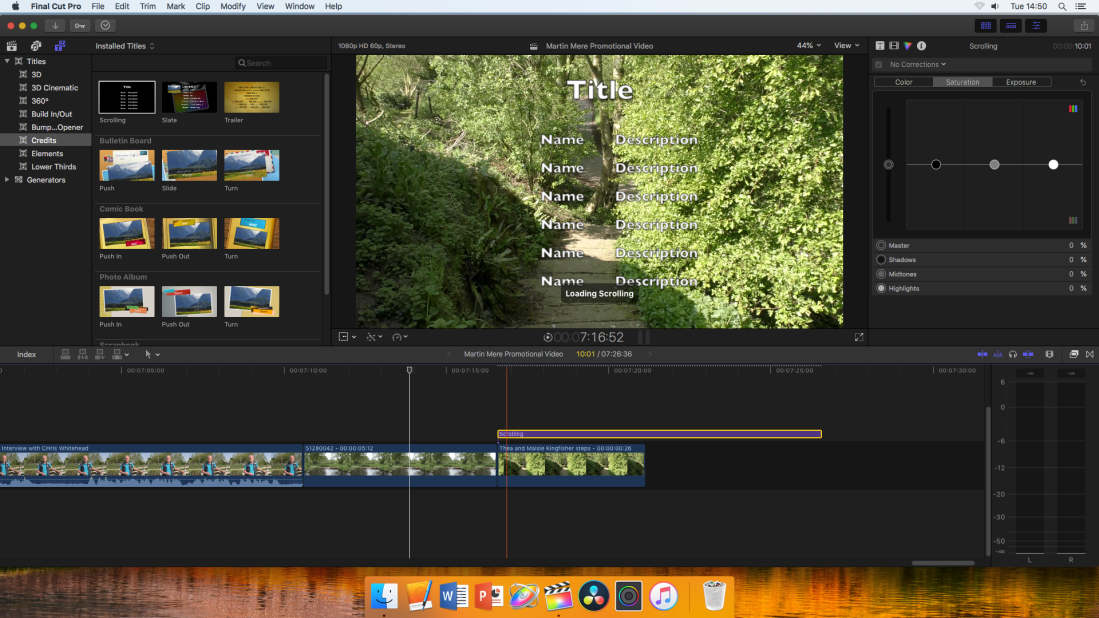
The information I added to the first freeze frame I already had planned in my shot list, I wanted to include the opening hours, the address, the car parking price, and the website name, for anyone that wanted to know something that wasn’t in the video. As for the credits I mentioned myself, and the roles I have played in my project, I mentioned Chris as my WWT interviewee, and I will also credit the website where I get my music from when it comes to it.
Overall editing session four has been another success, hopefully going out to film these last two vox pops is the last time I have to go out and film altogether, and hopefully I can finish editing at the start of next week after my re shoot.
After getting some feedback from my audience yesterday I decided to do some research into some of the things they pointed out that could do with improvement, so that when I edit tomorrow I can work on touching them up. You can see the feedback I got from my audience in my previous blog, there was a lot of things that picked up on, a lot of which I already knew about, and hadn’t got round to doing yet, never the less I thought I would look into some of the ones I am not sure about how to fix, and them tomorrow I can know how to do it, and potentially work on them.
Fixing the sound on my main interview:
This was an issue I knew I had to fix, I just hadn’t got round to it before showing my audience my rough edit. Due to them listening to the video through headphones the issue with audio was even more noticeable for the audience, which made a lot of them point it out. Because of this I thought i would take them noticing a huge push to get it fixed, and learn how to correct it, after finding out from my mentor there is one. After doing a search on Google, describing the problem I found a article telling me how to fix it.
https://larryjordan.com/articles/dual-channel-mono-audio-in-fcp-x/
In the article it is explained that on final cut pro a lot of time sounds can be displayed in single wave form. In some circumstances this format is fine, and doesn’t cause any issues, but other times it can be a nightmare. After explaining this the writer of the article goes on to explain how to fix it. When I next go onto the editing software to work on my project I will need to firstly select the clip that needs the audio fixing, and select the ‘inspector’ button (command 4 as a keyboard shortcut) with the inspector up I then need to go to the audio tab at the top of the inspector. Once on that I should be able to see the audio of my clip. From there all I need to do is select the ‘channels’ button and change the audio from stereo to duel mono. After that all I have to do is repeat the same process on any other audio clips, that have the issue.
Transforming the framing of my interview:
Something that my audience pointed out that I wasn’t aware of was how much excess room there was around Chris in his interview, giving him not a huge amount but a lot of head room, and quite a bit of space either side of him in the shot. Some people mentioned in my questionnaire that maybe I should either zoom in the framing a bit, or re film the interview, so it isn’t as far away. Although this isn’t a big issue, I am still keen to fix it in my edit, as I want it to be the best it possibly can be. For this I found another good article from Apple Support, which explained how I can alter the framing of the clip.
https://support.apple.com/kb/PH12604?locale=en_US
In the article it explains how you can resize and move around the framing of you clips post production with just a few simple steps. Firstly you select clip you want to edit, and place the play head over the clip, so it is displayed in the viewer. From there press shift T, and the transformer controls will appear in the viewer. From there you can just use the controls to play about with the framing of the clip, you can zoom in, move left and right, up and down, and even rotate around an anchor point. After getting the clip to the desired look you can just repeat the step on each clip, or copy and paste the attributes using command C and command, shift V to paste.
Colour correction/ fixing exposure:
Another thing my audience picked up on that I hadn’t is colour correction, and over exposure that is in some of my clips. Because if the beautiful weather on my filming days, some of the clips have lost a bit of colour, and are over exposed. To fix this I wanted to look into colour correction, and how to fix over exposure, and luckily I found another helpful article to help me.
https://support.apple.com/kb/PH20847?locale=en_US
To start colour correcting a clip the first thing you need to do is select the clip you want to fix and put the play head over it so the clip can be seen in the viewer. With that done you can then go into the inspector and select the colour option, or command 6. With that open you can then access the colour board, and other grading tools like the exposure and saturation, and you can just play around until you get your desired look for the clip. Something that can help this is using the video scopes which can show you different things about the shot like exposure diagrams, and the RGB parade can show different levels of each primary colours in each shot.
Overall, the research I have done for editing has been really useful, I as though now I can tackle some of the issues that have been brought to my attention in my project, and in my next few editing session I will be able to refer back to this research, and work on fixing them.
References:
Larryjordan.com. (2019). FCP X: Dual-channel Mono Audio | Larry Jordan. [online] Available at: https://larryjordan.com/articles/dual-channel-mono-audio-in-fcp-x/ [Accessed 6 May 2019].
Support.apple.com. (2019). Final Cut Pro X: Resize, move, and rotate clips. [online] Available at: https://support.apple.com/kb/PH12604?locale=en_US [Accessed 6 May 2019].
Support.apple.com. (2019). Final Cut Pro X: Add a color correction. [online] Available at: https://support.apple.com/kb/PH20847?locale=en_US [Accessed 6 May 2019].
